07.2.3 - Front Fork Adjustment - T9 Dual Chamber
FRONT FORK DAMPING
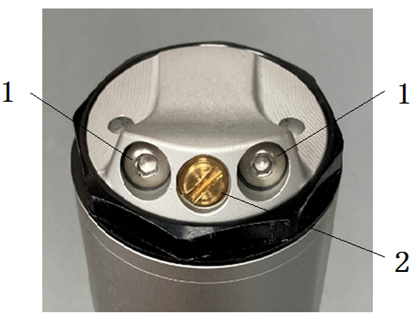
Compression Adjustment - position 2
This adjustment effects how quickly the front forks compress.
The compression adjuster has 18 click positions. Turning the compression adjuster screw 2 one click changes how the fork compression responds.
To adjust the forks to the standard position, please follow the instructions as follows:
- Turn the adjuster screw 2 fully clockwise until it will not turn any longer (lightly seated). This is the full hard position.
- Turn the adjuster counter-clockwise 6-7 clicks. This is the standard position.
- Make sure both fork adjustments are set to the same position.
Rebound Adjustment
This adjustment effects how quickly the front forks rebound back from a compressed position.
The rebound adjuster has 16-18 clicks. Turning the rebound adjuster screw one click changes how quickly the forks extend. To adjust the forks to the standard position, please follow the instructions as follows:
- Turn the adjuster screw 1 fully clockwise + until it will not turn any longer (lightly seated). This is the full hard/slow position.
- Turn the adjuster counter-clockwise - 10-11 clicks. This is the standard position.
- Make sure both fork adjustments are set to the same position.
FRONT FORK AIR PRESSURE
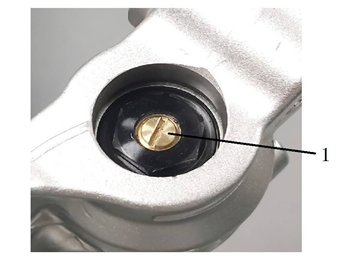
Air is usually an unstable gas which does build up pressure as its worked (usually in the forks). Air pressure acts like a progressive spring which effects the travel range of the forks. Meaning, the fork action on your motorcycle will get stiffer during a race or long hours on the test track. You need to relieve the accumulated pressure in the forks by using the pressure relief screws in the following order:
- Place the motorcycle on a motorcycle stand.
- Make sure the front wheel is off the ground, it must be fully extended. DO NOT remove the relief screw with the front wheel on the ground.
- Slowly remove the relief screw 1 by turning it counter-clockwise.
- Do this to both left and right fork.
- Remove the relief screw and check the O-rings are in good condition. If they are not, they need to be replaced before your next ride.
- Once the pressure has been released, install and tighten the relief screws by turning them clockwise. Do not over tighten them, just enough to be snug. Overtightening will damage the O-rings.