07.4 - Rear Shock Adjustment
The rear suspension of your motorcycle has 2 different adjustment points. It can be adjusted for the rider’s weight and riding conditions by changing the spring pre-load, rebound and compression damping points. It comes from the factory set to the softest setting. If you wish to make the rear suspension harder, follow the procedures below. Adjusting the rear shock is not hard, but like the front forks, changes should be made one at a time to gain an accurate understanding of how they affect the bike.
Once you are familiar with the settings on your suspension, you can quickly and easily adjust them to suit different terrain. For example, you know the setting position for when you ride in the sand dunes. But when you are riding on your local track you know to tune them to a different setting.
The rear shock absorber has a damper unit that containers high pressure nitrogen gas. Do not attempt to disassemble, service or dispose of it. Puncture or exposure to flame may also result in an explosion, causing serious injury or even death. Service or disposal should only be done by your dealer or a qualified mechanic that is equipped with the proper tools and safety equipment.
If your motorcycle is new, put about 2 hours of part throttle break in time on it to ensure that the shock absorber has worked in.
SPRING PRE-LOAD
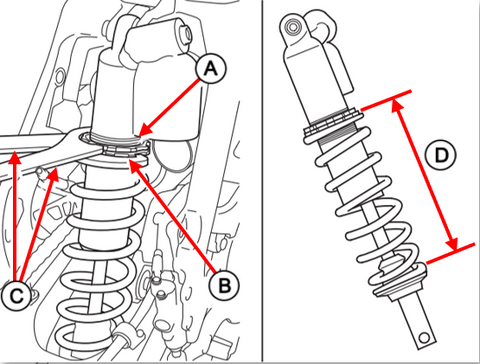
The spring pre-load should be adjusted when the engine is cold because it will be necessary to remove the muffler(s). A second spanner will be needed for turning the shock spring lock nut and adjusting the nut in order to adjust the spring pre-load.
- Recommended to place your motorcycle on a stand or equivalent support with the rear wheel off the ground.
- Remove the mufflers.
- Loosen the clamp on the air filter duct connecting the carburetor.
- Remove the battery terminal connectors.
- Remove the sub-frame with the air filter housing on one piece.
- Check that the spring pre-load is adjusted to the standard length.
- Adjust as necessary by loosening the shock spring lock nut and turning the adjusting nut
- One complete turn of the adjuster nut changes the spring length by approximately 1.5 -2 mm.
- After the adjustment has been done, hold the adjuster nut and tighten the spring lock nut.
- Make sure the lock nut is tight before you assemble the remaining parts.
Increase Spring Pre-Load
- Loosen the lock nut on the spring with the spanners and turn the adjuster nut clockwise to shorten the spring length
- One complete turn of the adjuster nut changes the spring length by approximately 1.5 -2 mm.
- After the adjustment has been done, hold the adjuster nut and tighten the spring lock nut.
- Make sure the lock nut is tight before you assemble the remaining parts.
Decrease Spring Pre-Load
- Loosen the lock nut on the spring with the spanners and turn the adjuster nut counter-clockwise to increase the length of the spring
- One complete turn of the adjuster nut changes the spring length by approximately 1.5 -2 mm.
- After the adjustment has been done, hold the adjuster nut and tighten the spring lock nut.
- Make sure the lock nut is tight before you assemble the remaining parts.
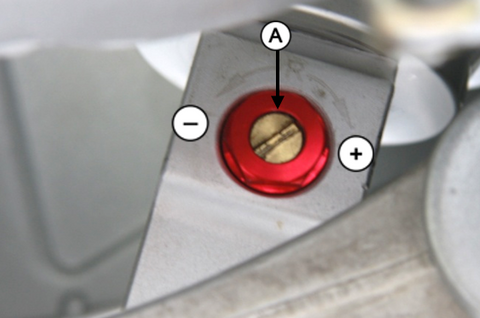
SHOCK ABSORBER DAMPING
Compression Damping (if applicable)
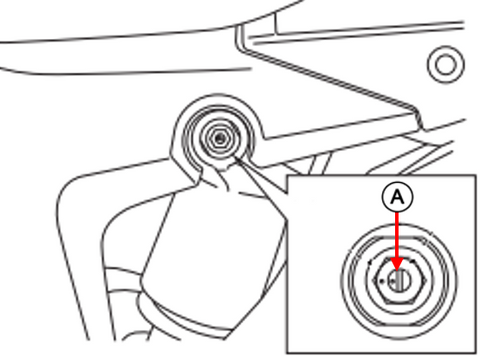
- The high-speed compression damping is effective when damping adjustment is desired for high speed operation.
- The low-speed compression damping is effective when damping adjustment is desired for low speed operation.
- Both the high and low speed compression damping can be increased or decreased by turning the center screw adjuster clockwise or counter-clockwise.
- You can adjust the adjuster by turning it 1/12th turn increments (clicks).
- Next, you will find the rebound adjuster at the bottom of the shock absorber, under the swing-arm.
This works much the same as the rebound screw on the front forks. It controls how quickly or
slowly the shock returns to its extended position after being compressed.
- Try turning it clockwise to allow the rear wheel to stay in contact with the ground over larger
rolling terrain.
- If you turn the screw counter-clockwise, this will give you a better ride over rough bumps that are
close together by allowing the shock to rebound faster and “hug” the flow of the terrain.
Rebound Damping
The rebound damping adjuster is located at the lower end of the shock absorber.
- It has 12-14 adjustment positions. Turning the adjuster screw one full turn advances the adjuster by 4 positions (clicks).
- Rebound damping can be increased by turning the adjuster clockwise or counter-clockwise
- To adjust to the standard position, turn the adjuster clockwise until it will not longer turn (DO NOT FORCE). This is the fully hard setting.
- Turn the adjuster counter-clockwise 9-12 clicks.